
To draw a recognisable dinosaur, begin with its largest shapes: the body, head, neck, tail and the points where the feet meet the ground. Small details can wait. A clear silhouette matters more than scales or stripes, and a few simple proportions can already distinguish a large-headed theropod from a horned herbivore or a long-necked sauropod.
This guide walks through four subjects: Tyrannosaurus, Triceratops, Stegosaurus and Diplodocus. Use a light pencil for construction lines, then strengthen the contour only after the pose feels balanced. The diagrams are simplified drawing exercises. Their colours are artistic choices, since the exact colours of these particular animals are not known.
What to prepare
Use ordinary paper, an HB pencil and a soft eraser. A softer pencil can make the final outline darker; coloured pencils or crayons are optional. A ruler is not necessary. Keep construction marks light so that you can move an oval, change the angle of a leg or lengthen the tail without leaving a deep groove.
Place the sheet horizontally. Before drawing, mark a small space for the head and another for the tail tip. This simple check is useful for every animal here, especially Diplodocus: its long neck and tail need room on both sides of the torso. Do not press hard while testing the proportions.
How to choose a first dinosaur
Pick the shape that interests you most. Tyrannosaurus is a useful exercise in balancing a large head and torso over strong hind legs. Triceratops has a broad skull that gives the drawing a clear focal point. Stegosaurus is recognisable from its plates, while Diplodocus teaches you to arrange long curves across the page.
Think of these as drawing subjects, not templates for every species in the same group. Each animal had its own proportions. For fossil-based comparisons, see the individual Tyrannosaurus rex, Triceratops, Stegosaurus and Diplodocus profiles in the dinosaur catalogue.
1. How to draw Tyrannosaurus
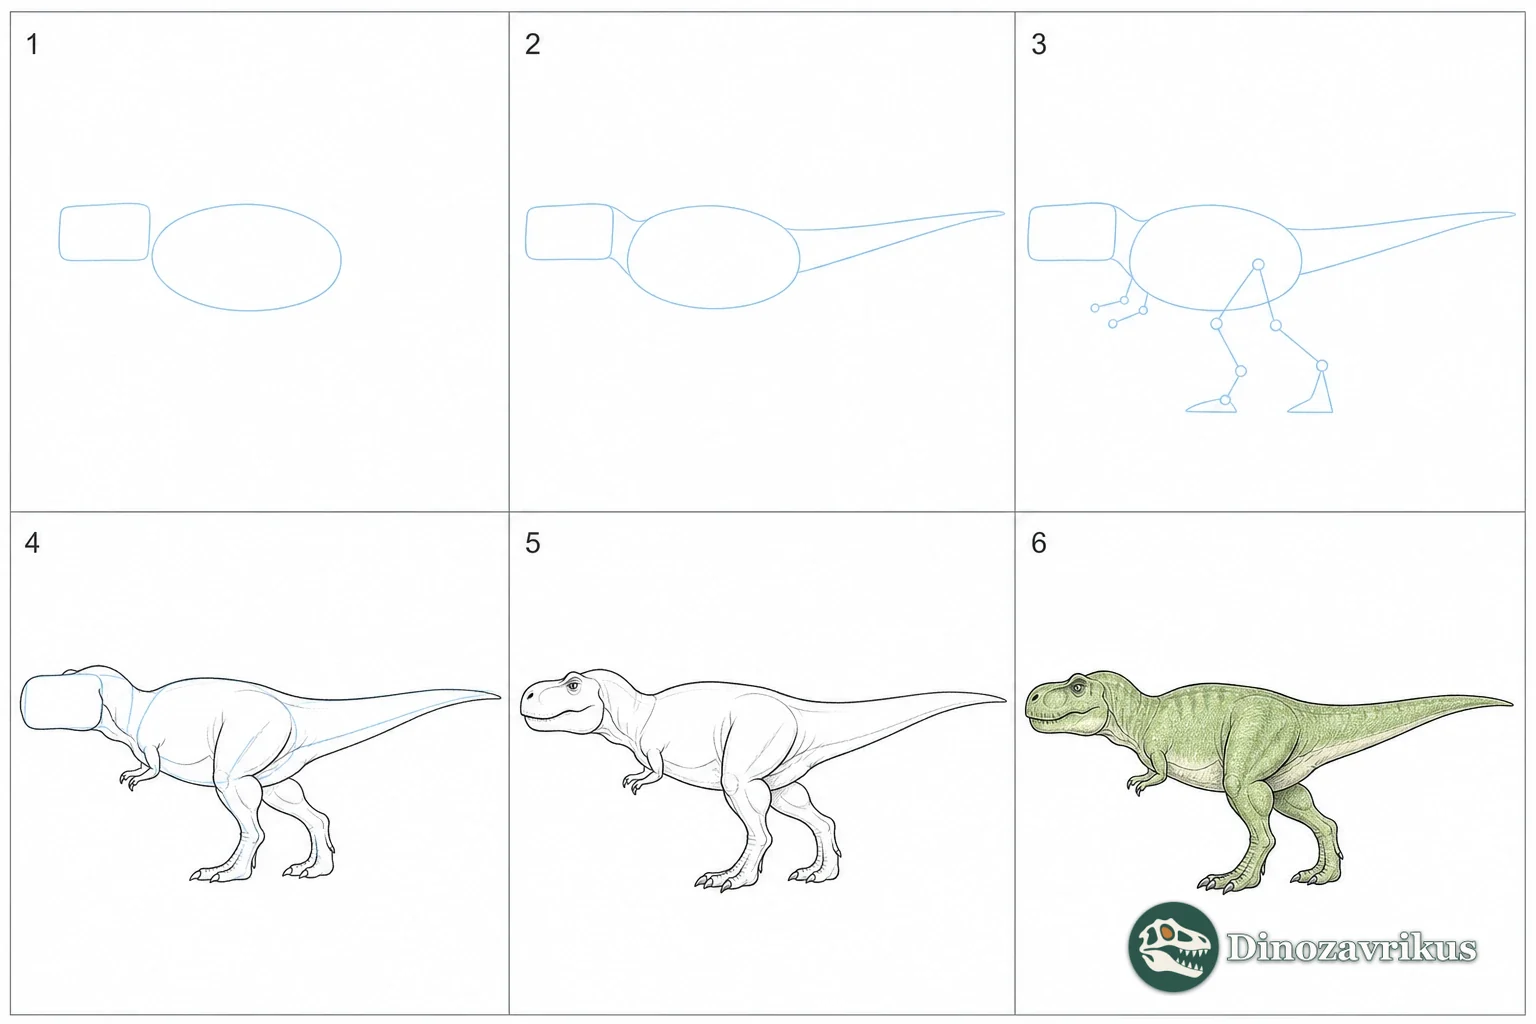
Step 1: torso and head
Draw a large horizontal oval for the torso, slightly right of the centre of the sheet. Add a smaller oval for the head to its left and a short guide line between them for the neck. The head should be large enough to read clearly but should not outweigh the torso visually. Keep the shapes separate for now.
Step 2: neck and tail
Join the head to the chest with two short curves. From the rear of the torso, extend two long, narrowing lines for the tail. Let the tail counterbalance the head: if the head projects far forward, the tail should stretch far enough behind the body to keep the pose visually stable.
Step 3: legs and tiny arms
Place two sturdy hind legs beneath the pelvis and chest. In a side view the far leg can be partly hidden, but show enough of its foot to make the stance understandable. Add the short forelimbs high on the chest. Their small size is one of the familiar features of the animal, so keep them compact rather than lengthening them into ordinary arms.
Step 4: connect the body
Use a smooth line along the back and a fuller curve under the belly to unite the construction ovals. The torso should remain deep, with the centre of mass over the legs. Avoid making the entire animal a row of equal-sized circles: the skull, chest, pelvis and tail each have a different role in the silhouette.
Step 5: refine the skull and feet
Shape a deep skull with a broad rear and a narrowing snout. Add the eye socket and a simple mouth line; rows of pointed teeth can be suggested with a few triangles rather than dozens of marks. Draw the toes and claws on the hind feet, then clarify the two digits on each small forelimb if the viewing angle allows them to be seen.
Step 6: clean outline and colour
Erase the construction lines that cross the finished body and darken the outer contour. Add only a little texture around the face and legs. Choose any colour scheme you like, but treat it as illustration rather than a recovered fact. The fossil record does not establish a precise colour palette for this drawing.
2. How to draw Triceratops
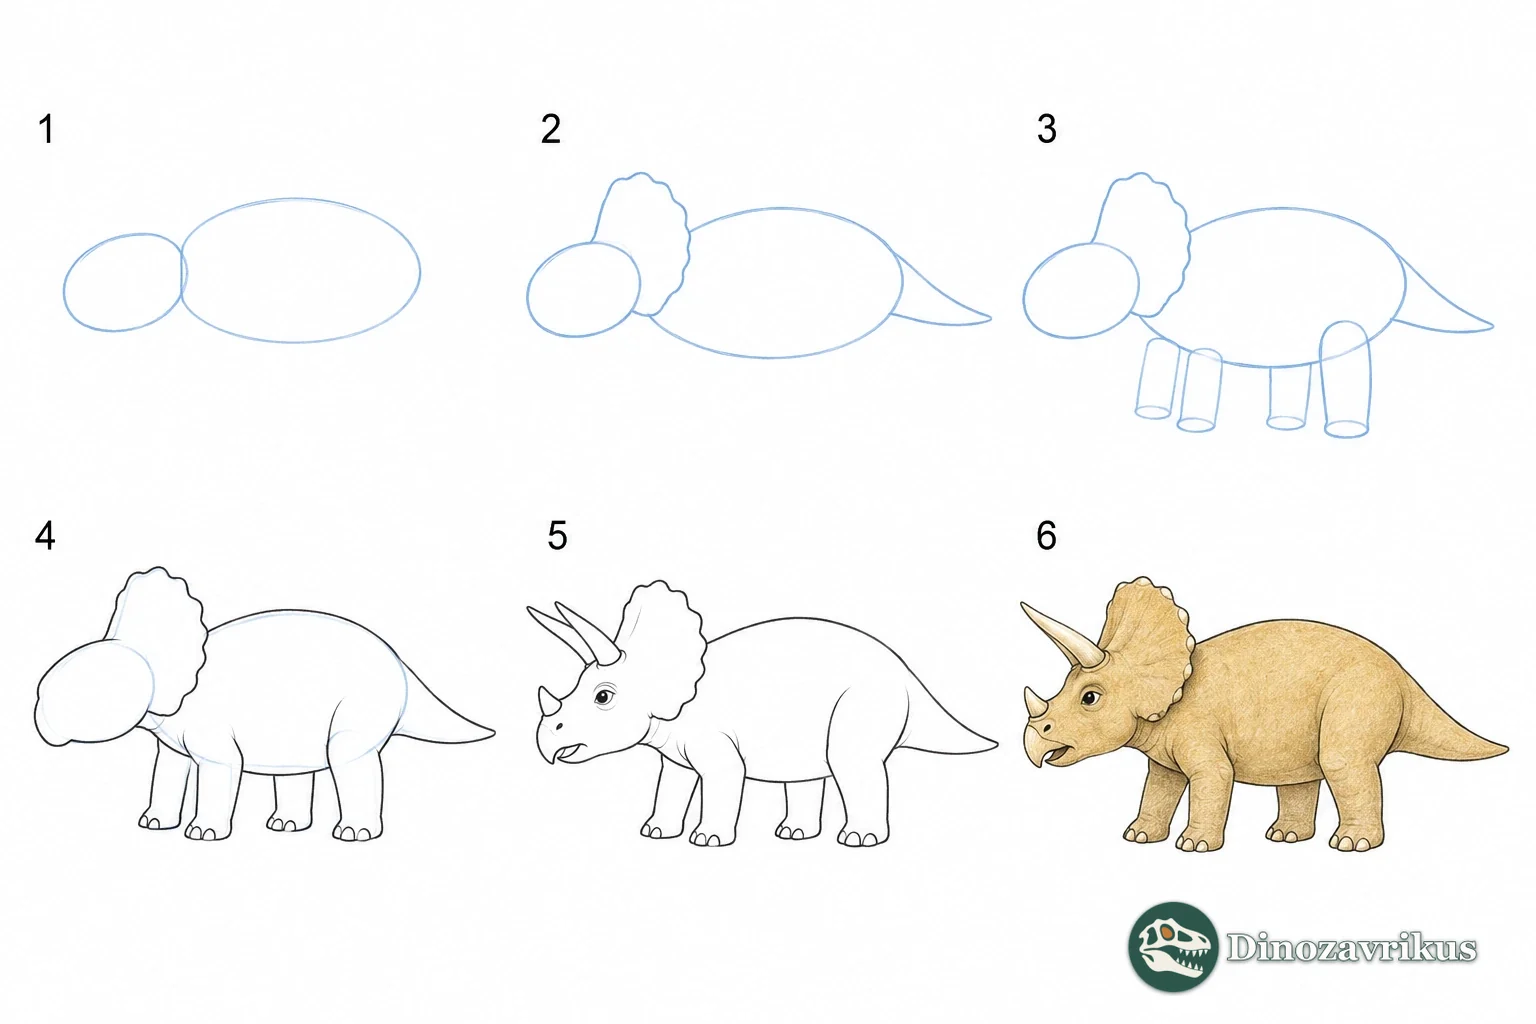
Step 1: two ovals
Draw a large oval for the body and a broad but shorter shape for the head. Leave a clear gap between them so that you can add the neck and shoulder. The head is wide and substantial, but it should still connect naturally to the torso.
Step 2: frill and tail
At the rear of the skull, sketch the outline of the frill as a wide shield. It may look like a rounded fan or a shallow oval depending on the angle. Add two tapering lines from the pelvis to form the tail. Do not let the tail compete with the head for width.
Step 3: four supporting legs
Place four legs beneath the body. The near pair will be easiest to see; offset the far pair slightly so that all four feet do not land on one line. Keep the legs sturdy and show how they support the weight of the torso rather than drawing thin, straight posts.
Step 4: connect the forms
Join the skull, shoulder and body with a gently sloping contour. Add a curved underside and a small transition into the tail. Check the silhouette from a distance: the head should be the broad front feature, the back should rise over the body, and the legs should remain visible beneath it.
Step 5: horns and beak
Add the pair of long brow horns above the eyes and the shorter nasal horn near the front of the snout. Draw the bony frill behind them and shape the beak at the tip of the jaw. These three horns make the head recognisable, so place them clearly instead of hiding them in a mass of small details.
Step 6: finish the drawing
Refine the eyes, mouth and feet, then remove the guide ovals. You can add a few marks along the frill edge or skin, but leave open areas so the main forms remain readable. Select a colour freely: no exact colour is known for this pictured individual.
3. How to draw Stegosaurus
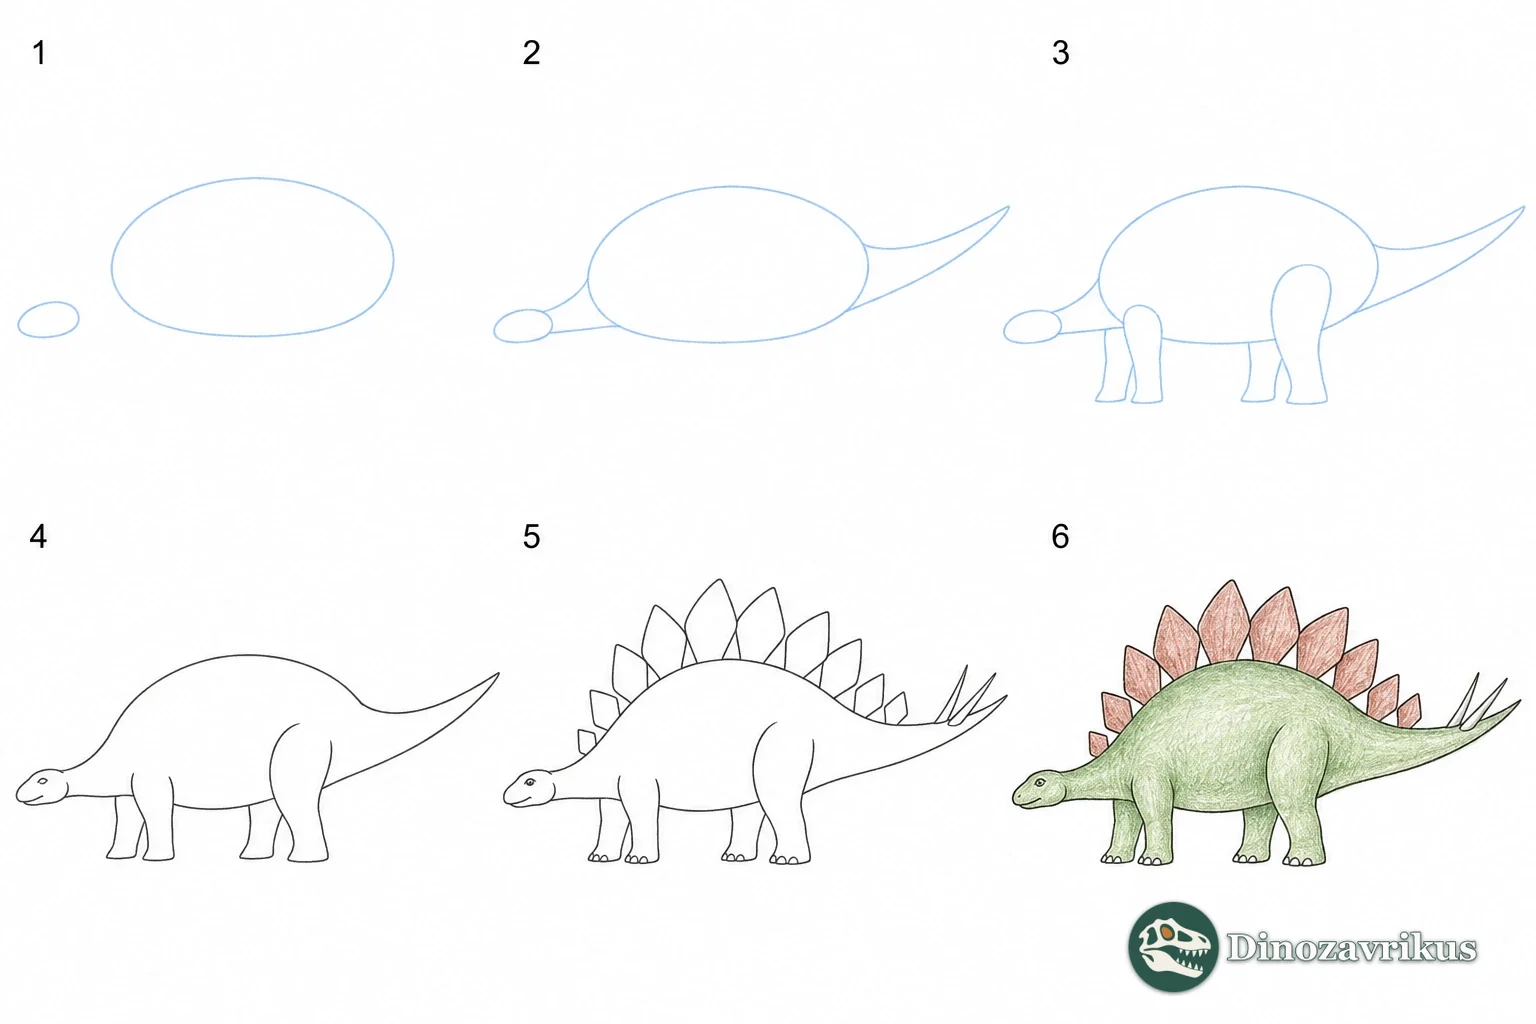
Step 1: large body, small head
Draw a long, deep oval for the torso. Put a small head to one side, low above the ground. The contrast between the tall body and the modest head is central to the silhouette, so do not begin with a large skull.
Step 2: low neck and tail
Connect the head to the shoulder with a short, downward-sloping neck. Extend the tail behind the body and let it taper. Leave room near its tip for the paired spikes that are commonly used to identify Stegosaurus in an illustration.
Step 3: legs of different heights
Draw four strong legs below the body. The hind legs are longer and taller than the forelegs. Show this difference without making the back rise into a sharp hump. Give each foot a base that meets the ground, and hide part of the far legs behind the near legs.
Step 4: smooth body contour
Connect the torso and neck with an even upper line and draw the belly above the knees. Refine the hips and shoulders so the legs appear attached to the body. Check that the small head remains forward and low rather than floating above the front of the torso.
Step 5: plates and tail spikes
Add a double sequence of plates along the back, alternating their positions from side to side. In a simple side view, some plates overlap, so vary their visible size rather than drawing a single flat row. Add the pointed tail spikes near the end of the tail.
Step 6: final details
Clean the construction lines and darken the plates, legs and face. Use a few curved strokes to suggest the plates' thickness. Leave the background simple; a ground line and a muted patch of plants are enough to anchor the animal without distracting from the outline.
4. How to draw a long-necked dinosaur: Diplodocus
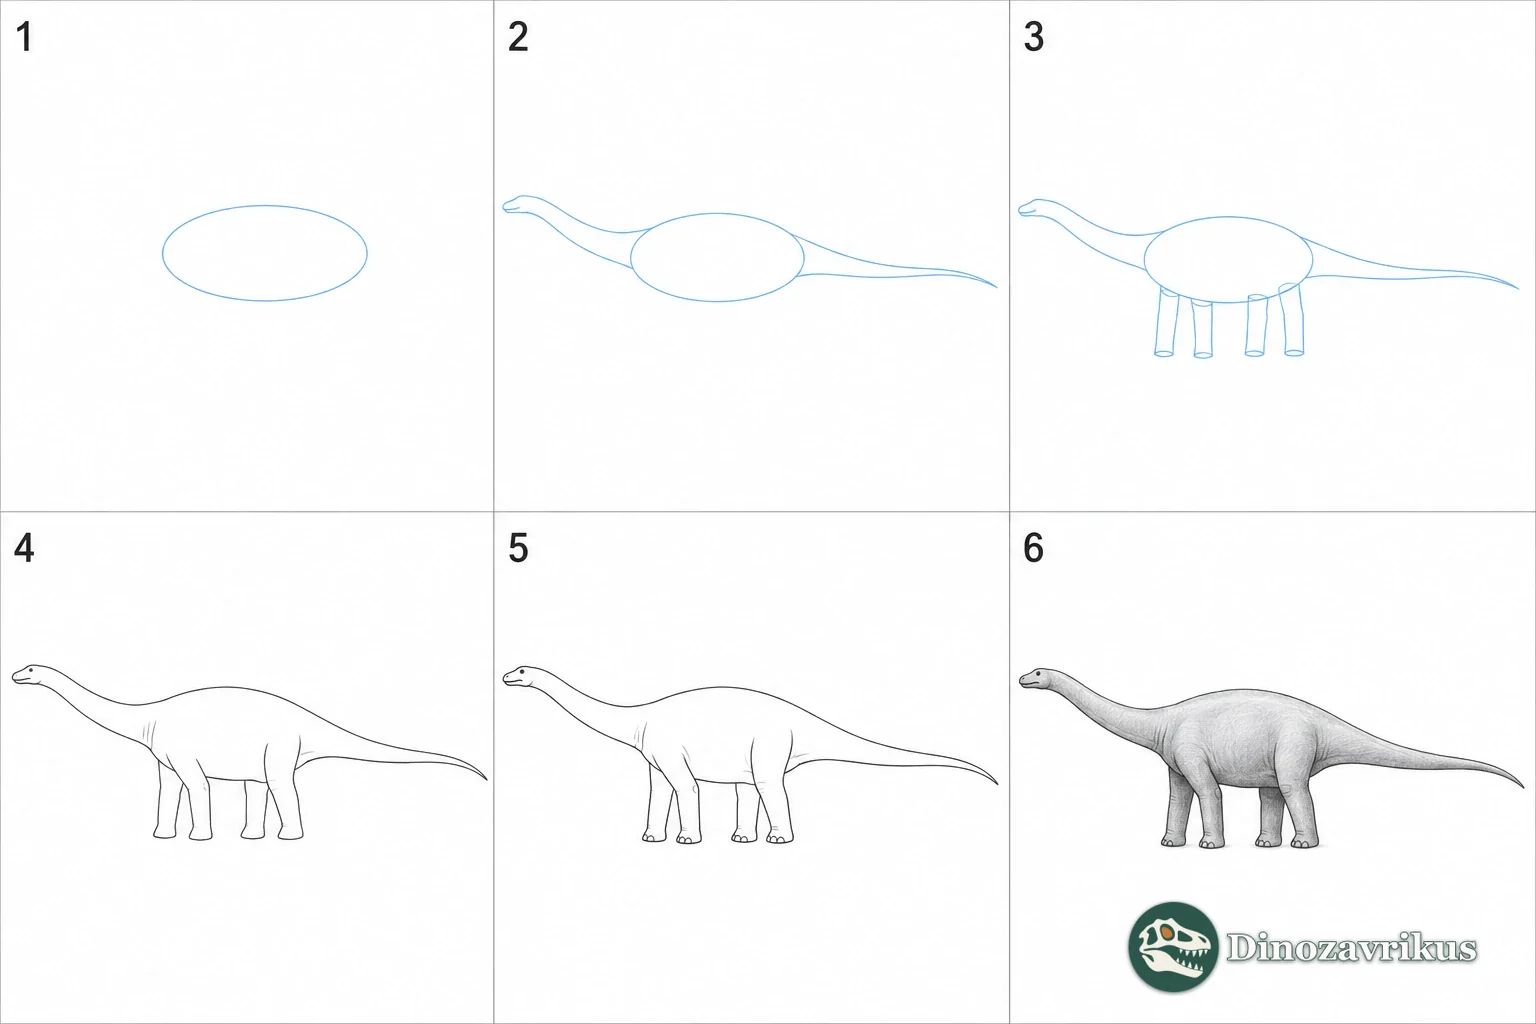
Step 1: a small central body
Draw an oval near the centre of the page. It may seem small compared with the animal you are about to draw, but the neck and tail will extend well beyond it. Leave open space at both ends of the sheet before adding them.
Step 2: two long curves
From the front of the torso, draw two long, gently rising lines for the neck. From the rear, draw two more lines for a very long tail that narrows toward its tip. The neck should rise before reaching the small head; the tail should continue the body line behind the hips.
Step 3: four legs
Place four column-like legs below the torso. The near legs cover parts of the far legs in a side view, but hint at all four supports. Keep the feet under the body instead of moving them toward the neck or tail, where they would make the animal appear to fall.
Step 4: one continuous silhouette
Join the torso, neck, head and tail with long smooth contours. Make the head small compared with the body and place it at the end of the neck rather than giving it a broad skull. The strongest challenge is proportion: compare the long spaces above and below the curves before adding details.
Step 5: small details
Add a tiny eye and nostril, a simple mouth line, and a few wrinkles around the joints if desired. Do not overload the long neck with markings. A clean outline communicates the animal better than repeated scales drawn across every surface.
Step 6: tone and setting
Erase construction marks and add a light shadow below the feet. A small plant or distant tree can show scale, but keep it secondary. Pick a colour as an artistic choice; the drawing does not claim to reproduce a known skin colour.
How to make a drawing feel three-dimensional
Use line weight to separate near and far forms. A slightly darker outline on the near side of the torso can make the body feel closer, while a lighter line on a partly hidden leg keeps it in the background. Overlapping shapes also create depth: the torso can cover the upper part of a leg, and the frill can sit behind the Triceratops skull.
Think about the ground plane. Feet should share a believable level unless the animal is deliberately stepping. A faint shadow beneath the body helps it rest on the page. If the pose looks unbalanced, return to the construction shapes and move a leg or change the angle of the head before adding texture.
Finally, compare the silhouette with fossil-based references rather than with one film design. A dramatic movie image may combine anatomy with invented colour or behaviour. The dinosaur catalogue offers individual profiles for checking basic body shapes; an illustration can then make its creative choices without presenting them as fossil evidence.
Frequently asked questions
What should I draw first when sketching a dinosaur?
Begin with the largest shapes: torso, head, neck, tail and the main supporting legs. Check the overall silhouette before adding teeth, scales or colour.
What materials do I need for these lessons?
Ordinary paper, an HB pencil and a soft eraser are enough. A softer pencil and coloured pencils are optional; a ruler is not required.
Which dinosaur is easiest for a beginner to draw?
Choose the outline that feels clearest to you. Triceratops has a distinctive head, Stegosaurus has an easy-to-recognise row of plates, and a simple side view of Tyrannosaurus or Diplodocus can be built from basic shapes.
Are the colours in the diagrams scientifically known?
No. The colours are artistic choices used to make the examples clear. The exact colour of these pictured dinosaurs is not established by the fossil material used for these lessons.